
How to Draw a Horse: Easy Step-by-Step Guide for Beginners
Learning how to draw a horse can seem tricky at first, especially if you are new to drawing animals. Horses have long legs, strong bodies, curved necks, and distinctive faces, so it is easy to feel overwhelmed when looking at the whole animal at once. The good news is that drawing a horse gets much easier when you break it down into simple shapes and easy steps.
One of the best things about horse drawing is that it works for many skill levels. A beginner can start with a basic standing horse using light guidelines and a simple outline, while more advanced artists can build on that structure with muscles, shading, hair texture, and movement. No matter your level, starting with a step-by-step approach helps you draw with more confidence.
If you have been searching for an easy way to draw a horse for a sketchbook, classroom lesson, art practice, or Pinterest inspiration, this guide will walk you through the process in a simple and encouraging way. Instead of aiming for perfection right away, the goal is to understand the shape of the horse and build it one section at a time.
In this article, you will learn how to draw a horse step by step, what basic supplies you need, how to make your sketch look more balanced, and a few creative ways to practice once you have the basics down. Whether you want a realistic horse drawing or a simple beginner sketch, this guide will help you get started.
Why Drawing a Horse Feels Hard at First
Many people struggle with horse drawings because they try to draw the final outline too soon. When you look at a horse, it is tempting to focus on the finished shape right away, but that can make the proportions difficult to manage. The legs may end up too short, the neck too stiff, or the body too small for the head.
That is why artists usually begin with simple forms instead of details. The body can start as circles or ovals, the legs can begin as straight guide lines, and the head can be blocked in with a basic shape before the face is refined. This makes the drawing process feel much more manageable and helps everything stay in proportion.
Once you understand that a horse is really just a collection of connected shapes, the whole subject becomes less intimidating. From there, you can slowly refine the drawing until it looks more natural and complete.
What You Need to Draw a Horse
You do not need expensive art supplies to draw a horse. A few basic tools are enough to practice and improve. Keeping things simple can actually make the process feel more relaxed, especially if you are still learning.
- Pencil for sketching light guideline shapes
- Eraser for correcting and cleaning up lines
- Paper or a sketchbook
- Black pen or fineliner for outlining if desired
- Colored pencils or markers if you want to add color
The most important tool is a pencil you can use lightly. Soft sketch lines are easier to adjust as you work through the drawing. That gives you more freedom to fix proportions without feeling like you have made a mistake you cannot correct.
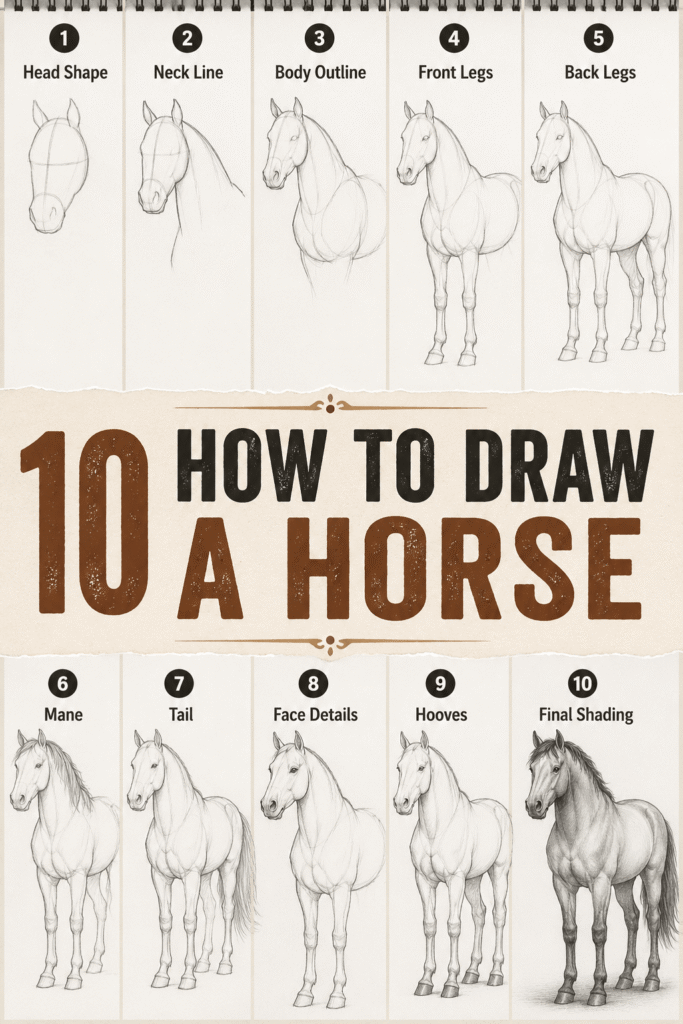
How to Draw a Horse Step by Step
The easiest way to draw a horse is to build it gradually. These steps help you move from simple shapes to a more finished horse drawing without getting lost in details too early.
1. Sketch the Head Shape
Start with the horse’s head. Draw a slightly long oval or an angled shape to suggest the face. Then add a smaller rounded area at the front for the muzzle. Do not worry about perfect detail yet. You are only laying in the basic structure.
2. Add the Neck
From the head, draw two curved lines downward to create the neck. Horses have a graceful neck shape, so avoid making it too straight. Let the lines flow naturally into the body area.
3. Build the Body with Simple Shapes
Use two large rounded shapes for the body, one for the chest area and one for the hindquarters. These do not need to be neat circles. They are just guides to help you understand the horse’s overall form. Connect the two shapes with gentle lines to start forming the back and belly.
4. Draw Guidelines for the Legs
Add straight guide lines for the front and back legs. At this stage, think of the legs as basic supports rather than detailed limbs. Make sure they line up with the body in a way that looks balanced and stable.
5. Shape the Legs
Now begin turning the leg lines into real legs by adding thickness. Horses have joints that bend in specific places, so notice where the knees and hocks sit. Keep the shapes simple at first and avoid overworking them.
6. Add the Ears and Face Placement
Draw two ears at the top of the head and lightly place the eye, nostril, and mouth. A horse’s eye usually sits farther back on the head than beginners expect, so take a moment to check placement before darkening any lines.
7. Refine the Head and Muzzle
Once the face placement looks right, reshape the head so it feels more horse-like. Smooth the forehead, define the cheek area, and refine the muzzle. Small changes here can make a big difference in how believable the horse looks.
8. Draw the Mane and Tail
Add the mane flowing along the top of the neck and sketch the tail from the hindquarters. You can keep them simple or give them more movement depending on the style you want. A slightly loose and natural line often looks better than a stiff one.
9. Add the Hooves and Clean the Outline
Shape the lower legs and add the hooves. Then go back through the whole drawing and clean up your outline. Erase extra guidelines and smooth out any awkward lines so the horse looks more finished.
10. Shade or Color the Drawing
Once you are happy with the outline, add light shading to create depth. Shade under the neck, along the belly, around the legs, and on the face where shadows would naturally fall. If you prefer, color your horse using shades like brown, black, gray, tan, or white.
Tips for Drawing a Better Horse
If your first horse drawing does not look exactly the way you hoped, that is completely normal. Horse anatomy takes practice. Small improvements usually come from noticing shape and proportion rather than adding more detail.
- Start with light guidelines instead of dark final lines
- Think in simple shapes before drawing details
- Check the length of the legs compared with the body
- Keep the neck flowing instead of stiff
- Use photo references when possible
- Practice the head separately if facial features feel difficult
It also helps to draw more than one version. Try a few quick sketches instead of spending all your energy on a single drawing. Repetition helps your eye understand the horse’s structure much faster.
Common Beginner Mistakes to Avoid
A very common mistake is drawing the head too large compared with the body. Another is making the legs too short or too straight. Horses have long, elegant legs and a lot of subtle curves, so keeping the posture natural is important.
Another beginner issue is adding detail too soon. It is much easier to place the mane, eye, nostril, and hooves after the body structure looks balanced. If the base shape works, the details will sit much more naturally.
Do not be discouraged if your first sketch feels stiff. Even a slightly awkward horse drawing can improve a lot with small changes to the neck, back, and leg angles. Drawing is often about adjusting, not getting it perfect on the first try.
Fun Ways to Practice Horse Drawing
Once you know the basic standing horse, you can try different styles and poses to build your confidence. This keeps practice more fun and helps you understand the animal better from different angles.
- Draw a horse head close-up
- Sketch a baby foal with softer features
- Try a cartoon horse with big eyes
- Draw a horse running for more motion
- Add a saddle for a western or riding theme
- Place the horse in a field or barn scene
You can also experiment with different art tools. A pencil sketch feels soft and classic, while markers or colored pencils can make the drawing brighter and more playful. Trying different styles can help you discover what kind of horse drawing you enjoy most.
Why Horse Drawing Tutorials Are Popular on Pinterest
Horse drawing tutorials do well on Pinterest because they are both useful and visual. People love content that teaches them how to make or draw something in clear steps. A horse is also a very popular subject because it appeals to kids, animal lovers, beginner artists, teachers, and hobby sketchers.
Step-by-step art content works especially well because it gives viewers a clear reason to save the pin. They can come back later and follow the steps at their own pace. That makes horse drawing guides highly shareable and perfect for creative boards.
Final Thoughts on How to Draw a Horse
Learning how to draw a horse becomes much easier when you stop trying to draw the whole animal at once and instead build it step by step. Starting with simple shapes, adding structure slowly, and refining the outline at the end makes the process feel far more manageable.
The more you practice, the more natural the horse’s proportions and movement will start to feel. You do not need a perfect first sketch to improve. Every attempt teaches you something about shape, balance, and line flow.
If you want a classic art subject that is beautiful, challenging, and rewarding to practice, horse drawing is a great choice. Keep your first lines light, work one section at a time, and enjoy watching the horse take shape on the page.
